

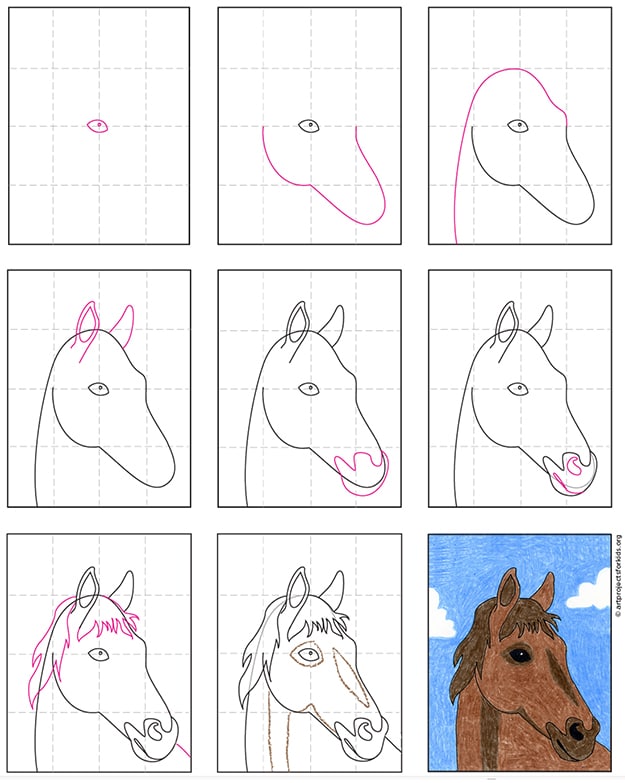
Okay, so I decided to try drawing a horse head today. Been meaning to practice animals more, and horses are just majestic, right? So I grabbed my pencil and paper and just started figuring it out. Here’s basically what I did, step-by-step, more or less.
Getting Started – The Rough Shapes
First thing I always do is block out the basic shapes. Forget details for now. I started with a big circle, kind of tilted, for the main part of the head, you know, where the cheek would be. Then, sort of overlapping and sticking out from that, I put down another shape, more like a rounded rectangle or a smaller oval, for the muzzle part. Didn’t press too hard, just wanted to get the basic forms down.
Connecting and Adding the Neck
Once I had those two main lumps, I started drawing lines to connect them, making it look more like an actual head shape. Smoothed the transition from the big circle to the muzzle thing. Then I drew two lines coming down from the back of the big circle to start the neck. Gotta remember horses have pretty thick, strong necks, so I gave those lines a nice curve.
Placing the Important Bits
This part helps stop things looking wonky. I lightly sketched a line across the bigger circle, maybe a bit above the middle – that’s where I planned to put the eye. And sometimes I draw a faint line down the center of the whole head shape, just to keep things balanced. Found this helps me not put the nose totally off to one side.
Drawing the Features – Eye, Muzzle, Ears
Okay, time for some actual features.
- The Eye: On that guideline I drew earlier, I put in the eye. Kind of an almond shape, set back a bit. Added a tiny circle for a highlight, makes it look less dead.
- Muzzle and Nostril: Went back to the muzzle shape, made it a bit more defined. Drew in the nostril – looks like a comma or a teardrop shape, gave it a slight flare. Defined the chin line underneath too.
- Ears: Stuck the ears on top, towards the back of the head circle. Made them pointy but not just triangles, gave them a bit of shape and thickness at the base. Tried to angle them like a horse might actually hold them.
Adding the Mane
Next up, the mane. Started sketching this from between the ears, flowing down the neck line I already drew. Just used wavy, flowing lines for now. Didn’t worry about drawing every single hair, just wanted the suggestion of movement and volume.

Cleaning Up and Adding Detail
Now I went back over the whole thing. Darkened the lines I wanted to keep, like the outline of the head, the eye, the nostril. Used my eraser to get rid of the first rough circles and guidelines I didn’t need anymore. Added a few smaller details – a line to suggest the cheekbone, maybe a hint of the jaw under the cheek, subtle curves on the neck to show muscle.
A Bit of Shading (If You Feel Like It)
Sometimes I stop there, but today I added a little bit of simple shading. Just scribbled lightly under the jaw, inside the ears, a bit in the eye socket, and maybe where the mane casts a shadow on the neck. Helps make it look a bit more solid, less like a flat cartoon.
And that was pretty much it! Stood back and looked at it. It’s definitely a horse head. Maybe not perfect, but hey, it’s practice. Every time I do this, it gets a little easier. The main thing is just starting with those simple shapes and building up from there. Give it a try!