

Alright, let’s talk about fiddling with those little screws on a 2-cycle carburetor. Had to do this just the other day on my string trimmer, it was bogging down something awful when I tried to give it gas.

Getting Started
First thing I did was make sure I had a clean spot to work and good light. Those adjustment screws are tiny. Needed a small screwdriver, the specific kind depends on the carb – some have splined heads, some Pac-Man, some just regular slots. Mine were simple slots this time, lucky me.
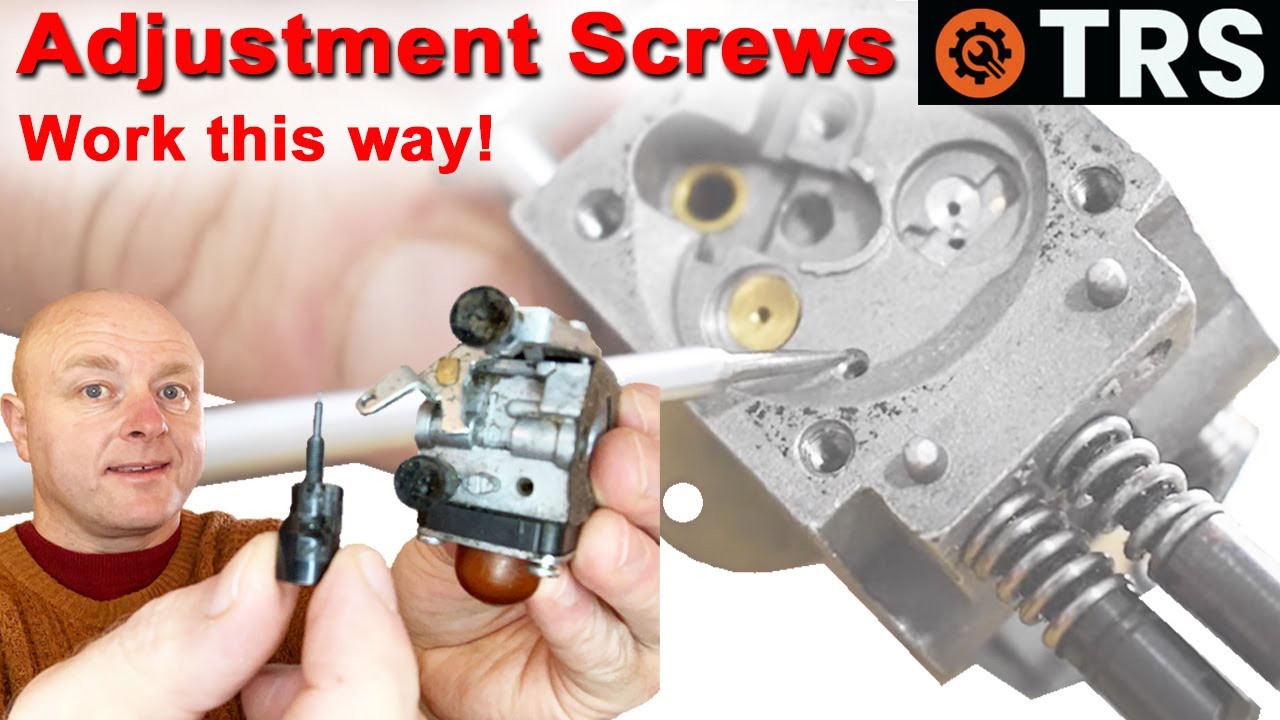
I found the carburetor tucked away behind the air filter. Usually, there are two, sometimes three, adjustment screws pretty close together. They’re often marked L for low speed, H for high speed, and sometimes T for idle speed.
Before messing with anything, I gave the area a quick clean with a brush. Don’t want dirt falling into the carb while you’re working.
Finding a Baseline
Sometimes the screws have limiter caps, which are annoying, but mine didn’t. To get a fresh start, I gently turned both the L and H screws clockwise until they lightly seated. Don’t force them tight! You’ll damage the needle and seat. Just snug.
Then, I backed each screw out about 1 and a half turns. This is just a rough starting point, gets things in the ballpark usually.
Warming Up and Tuning the Low End
Next, I started the engine and let it warm up for a few minutes. You absolutely have to tune these things when they’re warm, otherwise, your adjustments will be way off once it heats up.
With the engine idling, I focused on the L screw first. I slowly turned it clockwise (leaner) until the engine speed started to increase and sound a bit rough or unstable. Then I slowly turned it back counter-clockwise (richer) until the engine smoothed out and idled nicely. I kept going a tiny bit richer past the smoothest point, maybe 1/8 turn, helps with acceleration.
I tested it by blipping the throttle. What I wanted was instant, smooth acceleration with no hesitation or bogging. If it hesitated, I’d try turning the L screw slightly counter-clockwise (richer). If it sounded kind of gurgly or sputtered before picking up speed, I’d turn the L screw slightly clockwise (leaner). Took a bit of back and forth, just small adjustments each time.
Once the low speed felt responsive, I adjusted the idle speed screw (the T screw). I turned it until the engine idled reliably without the trimmer head spinning (or chain moving on a saw). Just fast enough not to stall.
Setting the High Speed
Now for the H screw. This one controls the fuel mixture at full throttle. Be careful here. Running too lean (too far clockwise) at high speed can overheat and seize the engine. Seriously, it can wreck it fast.

I held the throttle wide open. I listened carefully to the engine sound. If it sounded like it was screaming or excessively high-pitched and crackly, it was too lean. I immediately backed the H screw out (counter-clockwise) a bit.
If it sounded kind of blubbery or like it was “four-stroking” (a ba-ba-ba-ba sound instead of a clean ZZZZIIING), it was too rich. I slowly turned the H screw clockwise (leaner) until the four-stroking just cleared up and the engine ran strong and clean at full power.
Here’s the key part: Once I found that sweet spot where it ran clean at full throttle, I then turned the H screw back counter-clockwise (richer) just a tiny bit, maybe 1/8 turn. You want it to sound just slightly bubbly or hesitant when you first snap the throttle wide open, but then clean up quickly. This slight richness provides extra lubrication and cooling at high RPM, protecting the engine.
Final Checks
After adjusting both L and H, I re-checked the idle speed with the T screw, sometimes the other adjustments affect it. Then I ran the trimmer for a bit, actually cutting some grass. Listened to how it performed under load. Checked if it idled okay after working hard, and if it accelerated cleanly from idle again.
Made a couple more tiny tweaks to the L and H screws until it felt just right. It’s more art than science sometimes, listening to the engine tells you a lot.

And that was it! Took maybe 15-20 minutes total. The trimmer runs like a champ now, accelerates smoothly and has good power at the top end. No more bogging down. Just gotta take your time and listen to what the engine’s doing.